Posts: 643
Threads: 40
Joined: May 2023
Reputation:
30
01-26-2024, 02:27 PM
(This post was last modified: 01-26-2024, 06:36 PM by Jim Mac.)
I recently posted a circuit that would be cool to simulate, so I decided to give it a go in a real build. I was hesitant because I knew 1 part was gonna be a big PITA.. And YEP it was! (probably easy for the more advanced than I)
So getting 2 H bridges to output Square Wave AC 90 degrees out of phase is very easy, IF both waves are coming off the same Arduino or control board. But I need these input phases to be fully Isolated from each other, while still maintaining the phase shift. I in no way want the grounds bonded or tied together, as one return line must become the others input feed.
So synchronizing the 2 separate circuits to maintain the phase shift has to be done with no physical wires connecting the 2 circuits. So we need "Wireless Synchronization" between the 2 circuits.
I will be documenting this code in the "Arduino code" section of this forum and will post the link in this thread. I don't want to lose this code..
Update- Code now posted here- REMOVED
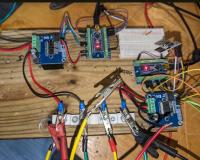
The circuit uses 2 Arduino's each with their own H-bridge. And each circuit also has a NRF24L01 Wireless transceiver. The first Arduino is the "Master" and the second is the "Slave". The master creates ordinary square wave AC like a normal H-Bridge, then transmits a 2.4G wireless signal to the receiver on the slave circuit when polarity flips occur. The slave is then programmed to create the same frequency square output, but delay the phase by 90 degrees by synchronizing the timing of the 2 separate circuits with the wireless transmitted message..
Now the first part is done- I have 2 circuits that are outputting 90 degree separated waves in sync with NO bonded ground connection between them.

Next challenge is untangling the input power requirements. These units need to be powered by separate sources with no common ground either. And the logic voltage does not match the H bridge voltage. So each Arduino needs a separate 5V source to power the logic, and the H-bridges need a higher power input. The 5V logic source and H bridge source of each side CAN and MUST share a ground, but the Slave and Master must be separate isolated sources. So I can probably just use 2 batteries or power sources with Buck Converters to throttle it to 5-7V to feed into the VIN of the Arduinos.
So updates will ensure
Posts: 643
Threads: 40
Joined: May 2023
Reputation:
30
Code is not working as expected.. When I adjust the frequency I lose the 90 shift! there are too many parameters to get this precise with this method.. Who who knows about the signal delay, print delay, etc.
BUT I have another way in store.. Much simpler but more wasteful.
BUILDING NOW. Might take me a bit tho before presented
Posts: 643
Threads: 40
Joined: May 2023
Reputation:
30
01-27-2024, 12:49 AM
(This post was last modified: 01-27-2024, 01:04 AM by Jim Mac.)
NICE....
Much easier and much more controllable. Now I can control the frequency and phases without changing code. Both circuits are completely isolated. Meaning there is no common ground needed..
In the video I am running the system off the same supply, I will try to work on the dual powering tomorrow.
Now when I merge this poly-phase into 1 output wave, the grounds can teeter and create the infinity loop I seek. And the idea of running the circuits between the 2 batteries is now possible..

Posts: 115
Threads: 1
Joined: May 2023
Reputation:
14
01-27-2024, 01:52 AM
(This post was last modified: 01-27-2024, 01:55 AM by solarlab.)
Hi Jim,
Love your Motor + Hall Effect Sensor work-around - also optimistic regarding your overall concept.
Quick Question: What H-Bridge boards/chips are you using? Are they any good?
Got a bunch of duds from Amazon [cheap] quit a while back but can't remember which ones,
very poor quality at best, I actually might have returned them or threw them out. TIA
Hopefull will find some time to try a "Flowcode (FC) V10" version (now free) of Ardunio Uno
Full H-Bridge code. Flowcode 10 has a nice simulation feature that I want to test - might as
well try coding something that might be useful... {btw, Arduino has a hard time with "delays"}
Use FC once in a while for STM32 - it converts flow diagrams to "C" code - I'm no good with "C".
SL
Posts: 18
Threads: 1
Joined: Oct 2023
Reputation:
1
Couldn't you also use a high speed opto-isolator / optocoupler to link the two Arduino boards together? Something like this? https://www.vishay.com/docs/84732/6n137.pdf
Posts: 643
Threads: 40
Joined: May 2023
Reputation:
30
(01-27-2024, 01:52 AM)solarlab Wrote: Hi Jim,
Love your Motor + Hall Effect Sensor work-around - also optimistic regarding your overall concept.
Quick Question: What H-Bridge boards/chips are you using? Are they any good?
Got a bunch of duds from Amazon [cheap] quit a while back but can't remember which ones,
very poor quality at best, I actually might have returned them or threw them out. TIA
Hopefull will find some time to try a "Flowcode (FC) V10" version (now free) of Ardunio Uno
Full H-Bridge code. Flowcode 10 has a nice simulation feature that I want to test - might as
well try coding something that might be useful... {btw, Arduino has a hard time with "delays"}
Use FC once in a while for STM32 - it converts flow diagrams to "C" code - I'm no good with "C".
SL
Thanks SL. I use the BTS7960 43A H-bridge. About 5 bucks each or buy in bulk from China for $2 each. They stand up okay to the abuse I put them through. Definitely can't withstand 43 amps without cooling, but they can take 5 times for current safely over the crappy L298N's. But I am rough with stuff, so I end up blowing them anyway.
I write the basic codes, but anything more advanced than mills and other common commands, I rely on chatbots to write the code. This design uses no "delays". Sense magnet, flip polarity. Same code on both. I am not familiar with "Flowcode". But I am sure certain projects have more optimal ways to code it.
(01-27-2024, 02:50 AM)lfarrand Wrote: Couldn't you also use a high speed opto-isolator / optocoupler to link the two Arduino boards together? Something like this? https://www.vishay.com/docs/84732/6n137.pdf
I never worked with them and thought they wound not work, BUT your comment made me look at some diagrams and they may indeed work! In definitely buying some to try. Thanks!
Posts: 643
Threads: 40
Joined: May 2023
Reputation:
30
01-27-2024, 12:35 PM
(This post was last modified: 01-27-2024, 12:56 PM by Jim Mac.)
OK Looking good..
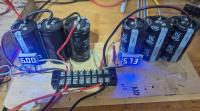
I made 2 Cap banks- Each with Three 2.7v 500 Farad caps in series. Giving me a max of 8V on each circuit, Isolated. Each circuit is running off a separate Cap Bank, and I am supply the 5V logic power from isolated batteries for now.

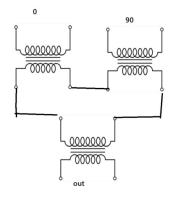
I am cross-connecting the H-bridges to the banks, so it pulls power from 1 bank and returns to the other. I am combining the polyphase to 1 output signal that is isolated through a transformer..
The dual circuit absolutely works and I have decent polyphase output.
Now to the next part. Since I can not easily measure power draw from the caps, and also it is worthless if we have to keep stopping the machine to charge the caps back up, I must get the "Loop" circuit in place to self-charge the caps from the output. Then just let her run and see what happens.
Now I can NOT just rectify the output and charge both caps, because this will allow the 2 cap banks to balance and ruin it. But I do want to make sure each Cap Bank gets the charge it needs to keep the banks potential difference equal, yet not allow them to exchange power to balance the cells..
I am thinking this can be done with standard diodes. Which allows each bank to take the charge they need while keeping the banks from sending to each other. And in theory, this should self-regulate to allow greater current to charge the cap bank that needs it more- Without my intervention.

Sure I could switch the output between banks, but if this idea works, I'd prefer to let the nature of current flow do all the balancing itself, while avoiding more complications.
So that's where this is heading.. Create 2 separate entities in a way which one is exhaling while the other is inhaling. And do it all in a way where the 2 entities can self-sustain by utilizing the exhaust from the other to compliment it's input.
Posts: 643
Threads: 40
Joined: May 2023
Reputation:
30
Ok, so it's been running for hours on 1 cap charge. I charged them both to about 7v and started it, feeding the output back to the cap banks like the diagram.
The cap banks very very slowly going down, after about 2-3 hours they are now at 4.55V, which shouldn't even run the H-bridges anymore. But the H-bridges are still working fine and producing perfect square waves, despite the low source voltage.
I am wondering how low the banks can go before it finally call's it quits..
There are a few possibilities that may be in play here, so although I find the urge to stop it to tweak, I will let her continue to run down till she stops on her own.
Other output configurations will also be tried next runs, and I did order the optocoupler's.
Now in all fairness, I must mention the caps are NOT running the timing motor or the arduino logic. But all the power that is running through the H-bridges and transformers is from the cap bank, and the induced it going back to the bank.
I will update when the H-bridges die off with numbers and my predictions on the system
Posts: 643
Threads: 40
Joined: May 2023
Reputation:
30
01-27-2024, 06:21 PM
(This post was last modified: 01-27-2024, 07:07 PM by Jim Mac.)
Okay, there she went.. Cap Banks went to about 4.3V before the H-bridges started to sputter out. So this gives me a reference for next tests..
I guess I need to see these caps Increase in charge as the machine runs. Or at least stay constant. I suppose I don't have to charge the banks so high to start.
But it was a good first run.. More to come!
Edit- Figured I should be documenting the output configurations I am trying with the results, so when I look back it's organized.
This test was this..

I had to use the extra transformer to step it back up, because the first ones stepped it down. Using what I got!
Posts: 643
Threads: 40
Joined: May 2023
Reputation:
30
01-27-2024, 09:34 PM
(This post was last modified: 01-27-2024, 09:43 PM by Jim Mac.)
There is a lot going on here. But here is 1 piece that needs to be comprehended.. Video Demo:
2 Isolated sources creating 2 AC waves (square waves) 90 degrees out of phase. Each wave feeds a separate transformer.
Scope watching 1 AC output before rectification. Now we short that transformer secondary, Square AC into the rectifier some drops amplitude.. (as expected) Actually I expected almost a drastic drop out, but we get only some dropout.
Now short the second transformer secondary, and the AC output of the first goes UP (even when shorted output).
If I get this right, the Lenz reciprocal does not have to work against us. What we take out of the system can be reflected back to the other side of the circuit.
|


